Showing posts with label preschool. Show all posts

Sunday, August 5, 2012

Exploring Music and Science with a Wind Organ


I love recycled crafts especially those that cover multiple areas of study. These recycled wind organs cover music, art, and science. It took us a while to collect up enough plastic bottles because we are not big plastic users, but we finally gathered enough plastic to make this cool wind organ.

A wind organ will make music when the wind blows. Our wind organ did not make a loud sound, but you could hear it if you were standing about 1-2 feet away from the organ which was a nice treat when we were working in the garden.

We used alcohol based markers (Sharpie®) to decorate the bottles. The marker seems to be holding up well even after getting wet.

You can use these wind organs for some science exploration for your children. Some questions to ask them as they blow into individual bottles:

1.       Which bottles make a high pitch sound?
2.       Which bottles make a low pitch sound?
3.       What do you notice about the holes of the bottles with a low pitch sound?
4.       What do you notice about the holes of the bottles with a high pitch sound?

We ended up with a nice discussion on how our simple wind organ works vs  a pipe organ.

For more information on a how a pipe organ works, please visit Pipedreams® website

For more information on wind organs including sound files from different wind organs please visit Pastorgan

Materials inspired by Plastorgan

Assorted plastic bottles
Knife
Scissors
Sharpie® markers
Twine or string

Directions

1.       Have an adult cut a skinny rectangle up the side of a bottle. I did this by inserting the knife in the bottle, then using scissors to cut the rest of the rectangle. You can cut different sized rectangles with varying heights but keep the width at the top and bottom the same to make the science questions are easier to understand for little children.

2.       Color designs on the bottles with the markers.
3.       Tie the bottles to a pole using twine. I found the easiest way to tie the bottles is to tie a loop around the neck of the bottle then tie another loop around the pole that you are attaching the wind organ to.

Posted on Simple Lives Thursday

Friday, June 1, 2012

Craft: Olympic Medals


We have been doing a unit study in order to prepare for the London 2012 games. I am so excited to watch diving, swimming, and gymnastics again this summer, so I wanted to transfer some of my excitement on to Little BBQ. We have been reading a lot about the history of the modern Olympics and famous athletes. We even read about this year’s venue.

One of the hands on projects about the Olympics we did this week was to make our own Olympic medals. Little BBQ loved this project. The best part of the project was after the medals were finished when Little BBQ decided to award each of us in the family with a medal. I think these medals will be around for a long time as part of our dress up collection. Little BBQ has been walking around telling everyone that he is an Olympic medalist. I love it.

This is a simple multi day project. On day one glue is applies to wooden disks and allowed to dry to give the medals a three dimensional look. On day 2, the medals are painted gold, silver, and bronze. On day 3, a marker is used to add more patterns on the medals. Finally, an adult hot glues a ribbon the back of the medals.

Materials (for pre-school – 5th grade)

3, 4 inch wood circles (we got ours at Hobby Lobby for $0.79)
Elmer’s School Glue®
Gold, Silver, and Bronze paint
Paint brush
Alcohol based markers such as Sharpie
3 strips 7/8” blue ribbon cut to 24-30 inches depending the size of your child
Hot glue gun

Directions

1.       Apply glue designs on the wood circles. Allow to dry overnight.
2.       Paint one medal gold, another silver, and another bronze. Allow to dry overnight.
3.       Apply more designs on the medals using an alcohol based maker.
4.       Have an adult hot glue the two ends of the ribbon to the back of the medals.
5.       Enjoy!

Monday, March 12, 2012

Toddler Nature Journal


It seems that everyone is talking about nature journals these days. They are a very popular tool for teaching children drawing, observation skills, and science. At our house, we use nature journals for even the smallest hands. A lot of people ask me how I manage to teach Little BBQ while having Miss Bubbles running around. Some things we do while Miss Bubbles naps, but there are some things that she participates in. Nature journaling is great for little hands. We use a combination of collected items, drawing, and photos for Miss Bubbles’ nature journal. Most of the photographs are of Miss Bubbles interacting with nature. I will also take photos or let her take photos of things that interest her. In the sample page above Miss Bubbles sampled some wild green onions, picked up lots of sticks, and hugged lots of trees.  She glued a feather into her book that she found while walking. We use basic white glue for her book. If you look closely you can see her excessive use of glue that is the toddler trademark, but luckily it dries clear so no harm to the notebook is done. I add the date and sometimes the location to each page.

Pictured below is Little BBQ’s nature journal page from the same day. For Little BBQ’s nature journal, we use found items (although he did not find anything that he felt was worth collecting on that day), photos of things that he finds interesting, drawings, observations, and photos of him interacting with nature. 

Thursday, February 9, 2012

Pinecone, Lard, and Bird Seed Winter Bird Feeders


We have been having an usually mild winter this year, but we decided to give the birds some good winter time bird food anyway. In general, birds need more fat during winter time, so we used lard in our winter bird seed this year instead of peanut butter because we got a half pig last year. Pigs have a lot of lard on them, and I have been struggling to figure out what to do with the all the lard. After a few batches of tamales and tortillas I still have lots of lard. I decided that the birds would probably enjoy some nice bird seed and lard since I was told by a local farmer that birds love lard.
To make these simple bird feeders, you just take some fallen pine cones and rub them in lard. Then, you can sprinkle some bird seed on top of the lard. We use a generic wild bird seed mix that attracts lots of different birds to our yard. Finally, hang up your easy bird feeders outside.

Friday, January 13, 2012

Freezing Art

Pin It

For Christmas I got the kids some liquid water colors because I was tired of struggling to get the water color pellets to produce nice vibrant colors that I had seen on so many art teacher blogs. Our first project with the new liquid water colors was a science experiment on freezing. I got the idea from the book, Science Arts by MaryAnn Kohl and Jean Potter. The book is fantastic. The book uses art projects to explain science concepts. This book is great for a child who loves art or a child that is weary of science.
In this experiment, the concept of diffusion is explored when children paint on a wet piece of paper with water color paints. Diffusion is when the paint molecules spread. Then, the concept of freezing is explored when you place the painted piece of paper is placed outside in freezing temperatures or in the freezer. When freezing occurs, the water molecules line up into organized structures to create sheets of ice. We took the experiment one step further and watched the paper thaw again in the house. In this case you can watch the paint become more diffuse again causing the intensity of the paints to diminish as the pigments in the paint spread out over the piece of paper.  I recommend taking pictures of your paints before freezing, after freezing, and after thawing to see how much the paint diffuses. The results with liquid water colors can be really stunning. This experiment is appropriate for preschool to early elementary aged children. My toddler also participated, but she does not have a concept of diffusion yet.
Science concepts explored in this experiment: diffusion, freezing, states of matter (liquid and solid), thawing
Materials modified from Science Arts p 101
White paper
Water
Liquid water colors
Cookie sheet
Plastic wrap
Freezer or freezing temperatures outside (we put out paintings outside)
Directions
1.       We the white piece of paper. You want the entire paper wet.
2.       Paint the wet piece of paper with liquid water colors. I recommend taking a picture of your work after this step. Observe how the paint diffuses outward as you paint.
3.       Place the piece of paper on a cookie sheet and place a piece of plastic over the painting.
4.       Place the painting outside or in the freezer.
5.       After 12-24 hours, remove the plastic wrap from the painting and observe the ice crystals. I recommend taking a picture now.
Miss Bubbles': painting a wet piece of paper
After freezing:

The ice up close:

After thawing:
Little BBQ's painting:
After freezing:

After thawing:


Posted on We Love to Paint

Thursday, August 25, 2011

Eric Carle Style Art


This week when I exploring some new art options for Little BBQ I came across Eric Carle's web-site where he has short videos on how to make the caterpillar found in the Very Hungry Caterpillar. How cool is that? I thought that the technique was a little too difficult for Little BBQ and a few too many steps at this age, so I modified the technique to have few steps for him. The modified technique did not have the rich textures that Eric Carle's caterpillar had, but it was still a lot of fun and came out nice.

For the modified Eric Carle caterpillar technique we used colored tissue paper instead of white. This saved us from taking a white sheet of tissue paper and having to paint it a solid color. I also pre cut the shapes for Little BBQ since I did not think that he had the patience to cut delicate tissue paper without tearing it, so this saved us another step. We taped out caterpillar onto a piece of string to hang on the wall because the caterpillar was too large to fit on a piece of paper, but you can easily glue a smaller caterpillar on a piece of paper.

For reading about caterpillars we read Waiting for Wings by Louis Elhart along with the Very hungry Caterpillar because Waiting for Wings went into more detail about butterfly anatomy and was a little more detailed on the life cycle of butterfly than the Very Hungry Caterpillar. I also like that the book was simple enough for Little BBQ to read out loud to me. The sentences are short and each page contains a single sentence making the reading bite size.

Materials

Colored tissue paper
Scissors
Paint
Dish
Water
Paint brush
Bubble wrap, small piece
String
Tape
Glue
Eye
Marker

Directions

1. Cut the tissue paper into caterpillar parts. You can use circles or another shape for the body and head of a caterpillar. You can have the child do this part if they are gentle and coordinated or you can have an adult do this part.
2. Put a little paint in a dish and add a little water. Mix well.
3. Have the child paint a design on the tissue paper shapes. Eric Carle usually does zig zag lines. My son did blobs.
4. Allow the tissue paper to dry.
5. Add a little more paint and water to a dish and mix well. Use a different color than you did with the first paint.
6. Add dots to the caterpillar parts.
7. Allow to dry.
8. Add a little more paint and water to a dish and mix well. This should be a unique color that has not been used before.
9. Dip the bubble wrap in the paint and stamp the paint on the caterpillar pieces.
10. All the tissue paper to dry.
11. Arrange the caterpillar in the desired order. Flip the pieces over. Measure a string two inches longer than the tissue paper pieces.
12. Tape the tissue paper pieces to the string. Leave 1" on either side of the caterpillar.
13. Flip the caterpillar back over and glue an eye on the head and with a marker draw a mouth.
14. Hang up your creation!

Posted on Kids Get Arty

Tuesday, June 21, 2011

Cheap and Easy Bathtub Paint

One of my friends posted a great idea for bathtub paint on Pinterest. The original idea came from Meet the Dubiens. The idea was so simple that I was kicking myself for never thinking of it before. To make easy bathtub paint just add a few drops of food coloring to shaving cream. We have tried to play with shaving cream in the bath tub before, but Miss Bubbles and Little BBQ were never that interested. I guess white shaving cream on a white bathtub wall is just not that enchanting, but when you add color the shaving cream it is a whole new story. Both kids were excited and loved painting on the bathtub walls with the colored shaving cream. The best part is that it is much cheaper than buying expensive bath tub paint from the store. Miss Bubbles has painted in the bath tub twice today, and I am thankful that this is much easier to clean up after than her usual painting adventures. I call this activity a double win for me and the kids on this gloomy rainy day.

Friday, May 20, 2011

Book: My Friends the Flowers

I love the flowers of spring. Spring this year is even more exciting because we are living in a new location, and that means new flowers. Last year Miss Bubbles was still little and could not tolerate being outside much, so we did only small chunks of time outside. This year Miss Bubbles is bigger, and we have a backyard, so we are spending lots of time outside. One of my favorite things that I did as a child was to press flowers and make collages out of them.

I decided that it was time to let Little BBQ enjoy this favorite past time of mine. Last week we picked flowers from the backyard, then we placed them between newspapers and put them under some heavy boxes. One week later we had some nicely pressed flowers. To give Little BBQ some inspiration we read the book, My Friends the Flowers. The book used a lot of personification to give personalities to the flowers. Then, in the back of the book there was a small identification guide for flowers. Most of the flowers in the back of the book we did not find in our backyard, but it was still fun to look at the pictures of the flowers.

After reading the book, I let Little BBQ make his collage. I was thinking that this was going to be a 2 dimensional project, but Little BBQ decided to stack the flowers individually on top of each other and glue them that way. It is funny sometimes how I envision an art project and how Little BBQ interprets the project in a completely different way.


Shibley Smiles


Sunday, May 15, 2011

Addition with a Soroban Abacus

Soroban Abacus; Shown is the number 123456789 (zero is represented with all the beads pushed toward the sides)
Early on I decided that I wanted to teach Little BBQ how to add using an abacus, so I always assumed that I was going to either buy or make an abacus with 10 beads per column since we use a base ten system in our society. However, when I started reading, Here's Looking at Euclid by Alex Bellos, I started to change my mind. He made some sound arguments that our brains can quickly differentiate between 1, 2, and 3 items but as we go higher in the number scale it becomes harder and harder for your brain to process more than three (p 14).

It seems that many ancient cultures understood this phenominon. You can see from the diagram below that the Chinese, Romans, and Idians all used dash marks for numbers 1, 2, and 3, but once you got past 3 they changed the symbol to another unqiue symbol in order to quickly distinguish the higher number (p 14).


Armed with this new found perspective I decided that an abacus with 10 beads did not make sense because Little BBQ would not be able to quickly distinguish the difference between 6 beads or 7 beads. I wanted the abacus to be an efficient tool for learning, and not a source of frustration. Many modern abacuses designed for children use brightly colored beads to distinguish the different numbers, but I still think that fewer beads will allow for faster processing.

I decided that a soroban abacus made the most sense. The soroban abacus uses five beads per column. By adding an extra horizontal line bisecting the columns you can quickly represnt the numbers 0-9 on one column. The soroban abacus was used between the seventh and nineth centuries in Japan to accomidate a new merchant class of people who needed to be able to quickly add numbers (p 40). To ease the transition between the abacus and the electronic world an abacus attached to an electronic calculator was sold in Japan for many years (p 41). Interestingly, addition is still quicker with an abacus than an electronic calculator since the answer to an addition problem is in front of you as soon as you  input the values while the calculator still needs to be told to process the information to come up with an answer (p 40). The efficiency of the abacus is probably why it is still a popular tool studied in Japan today by school children who form after school clubs to compete in adding a long series of numbers as quickly as possible using a soroban abacus (pp 40-41).

When a student becomes an soroban abacus master, he can move on to azan. Azan is a technique for visualizing a soroban abacus to quickly add numbers. Proficient pupils in azan can add a series of 15 numbers quicker than a person can use an abacus, pen and paper, or calculator. The catch is that each number is only shown for 0.2 seconds (p 42). That is hardly long enough to process the number on the screen. Azan students keep a visual soroban abacus in their head and when a new number is flashed the student visually moves the beads on the soroban abacus around in his head keeping a running tally of the sumation (p 42).

Interestingly, nueral imaging studies have shown that adding with soroban abacus stimulates areas of the brain that are associated with visuospatial processing while pen and paper addition stimulates areas of the brain that are associated with linguisting processing. In other words, the abacus uses the right side of the brain while the pen and paper method uses the left side of the brain. The soroban abacus is an excellent learning tool for visual students.

Want to really stimulate your brain? Some Japanses students can play shiritori while practicing azan (p 43). Shiritori is a word game where the first person says a word then the next person says a word that starts with the last syllable of the original word and then the first person makes a new word using the last syllable of the second word. The game continues on in this pattern. Bellos gives this demonstration of a young Japanese girl who is a soroban prodigy while she plays shiritori. In the demonstartion the girl is shown 30 three digit numbers during a 20 second time period while playing shiritori (p 43). Her shiritori dialogue with another student is shown in the text below

Ringo
Gorira (gorilla)
Rappa (trumpet)
Panda (panda bear)
Dachou (ostrich)
Ushi (cow)
Shika (deer)
Karasu (crow)
Suzume (sparrow)
Medaka (killifish)
Kame (turtle)
Medama yaki (fried egg)

At the end of the 20 seconds the girl states that the summation of the 20 numbers is 17,602 (p 43).

Given the sucess of soroban abacus training, I have decided to teach Little BBQ addition using a soroban abacus. To make the experience more person for him, we made our own soroban abacus out of a card board box.

Materials

card board box, lid removed
paint
ruler
knife or scissors
string
breads
tape

Procedure

1. Have the student paint the card board box.
2. Decide how many columns you want the abacus to contain. Cut notches into the top and bottom flaps of the cardboard box equal distance apart for the set number of columns that you chose (we  made our abacus with nine colums all 3.2 cm apart).
3. Cut the string to stretch across each the box from one notch to the other. Place 5 beads on each string. Insert the string in the notches and tape the string to the box. Continue in this pattern until all the columns are finished.
4. Make two notches on the sides perpendicular to the columns. These notches should be close to the top of the box but far enough away from the edge so one bead can comfortably fit abvoe the string line. We decided to use a red string to distinguish this line from the columns in our soroban.
5. Insert the string in the notches perpendicular to the columns. Tape the string.

Posted on Tutorial Tuesday

All references are from the book:

Friday, May 6, 2011

Painting with Pine Needles

We are trying to incorporate more outdoor art in our days since it is finally becoming nice outside. This week I decided to let the kids paint outside. Little BBQ painted with pine needles and Miss Bubbles had her finger painting experience. Little BBQ was apprehensive to use pine needles as his paint brush at first. He he looked at me kind of funny when I told him that we were going to paint with the pine needles. I showed him on a piece of paper how I painted with pine needles, then he got really into painting with the pine needles. He experimented with a splatter painting technique, and he experimented with using the needles like a regular paint brush. It was fun to watch him experiment and create.

Miss Bubbles did not grasp the concept that I gave her paint to paint on the paper. Instead she mainly painted herself even I took her paint filled finger and placed it on the paper. She preferred to be a living piece of art instead. She really had an interest in painting her knees. I was also thankful that I decided to take off her dress and put a disposable diaper on her since she got so messy, but it was fun. After she painted herself, she got distracted and wanted to run through the grass in the yard. I love warm spring days when we can freely explore art and nature.
Miss Bubbles
The Finished Product


Friday, April 22, 2011

Egg Shell Art

Crushed Egg Shell Art

Pin It


We were originally going to have 18 cascarones this year, but I dropped some of the eggs on the floor, and they shattered. Instead of crushing them further and adding them to my garden like I normally would I decided to make an art project out of the crushed eggs. Little BBQ took the egg shells and added them to egg dye. We dyed them like a normal egg. Then I let Little BBQ have a bottle of glue and the dried crushed eggs. He took my patterns from my marshmallow Easter candy and glued the egg shells to the patterns creating a fun little Easter project that we will probably do again in winter when I don't have a garden that needs extra calcium from the egg shells.

Materials (source: from our home)

Broken egg shells
Cups
Hot Water
Food coloring
Vinegar
Paper towels
Paper
Glue

Directions

1. For each color of egg shell, you will need 1 cup for dying the shells, 1 cup hot water, a few drops of food coloring, and 1 tsp vinegar. Mix these ingredients together and add the eggs shells.
2. Once the egg shells are the desired color, remove the egg shells and let them dry overnight on a paper towel.
3. On the next day, glue the egg shells to a piece of paper to create a work of art.


Posted on Easter Blog Hop

Melting Experiment: Molded Crayons


It has been a rainy week here in the Midwest which means lots of energy has been flowing through our house. We decided to make some molded crayons in spring shapes. My mom did this project with me as a kid. As a kid we did the project as an art project, but I decided to use this opportunity to teach Little BBQ about melting. Melting is simply changing a solid to a liquid by using heat. This leads to a discussion about what is solid and what is liquid? We ran around the house and found examples of both solids and liquids.

To get the pretty spring molded shapes we use a candy mold. The crayons were all broken already peeled crayons, so this was a frugal rainy day activity. We heated the broken crayons in the microwave. We sorted the crayons into different containers for each color. It took about 4 minutes to melt the crayons in the microwave. Using oven mitts Little BBQ poured the liquid crayons into the molds. The first time we melted the wax in the microwave we made the wax too hot and melted part of the mold, so you want to take crayons out of the microwave as soon as they become liquid so you can preserve your candy mold for later use. Once the crayons were dry we flipped the mold over and the crayons fell out. Little BBQ went a little nuts pouring the wax on top of the mold and over filled some of the molds, so we broke off the excess crayon after we took the crayons out of the mold. You can remelt the excess crayon again. To clean out the dishes that you melt the crayon inside, microwave the dish for about 30 seconds and wipe away the warm wax with a paper towel (I did this part).

This was a fun project that we all enjoyed. Miss Bubbles enjoys coloring with the large butterflies because they fit into her hand easily. Little BBQ thought that they were pretty. I think we will do this project again when we accumulate more broken crayons.

Materials

broken crayons with papers removed
microwave safe bowls
oven mitts
candy mold

Directions

1. Sort the broken crayons by color. Place the different colors in a different bowl.
2. Microwave the crayons until just melted, about 4 minutes on high.
3. Using oven mitts, carefully remove the melted wax from the microwave.
4. Pour the wax over the mold. You can add several different colors to the mold.
5. Allow the wax to cool.
6. Turn over the mold and pop out the new crayons. Any excess wax can be trimmed and remelted.


Shaving Cream Art

We love art in our house on long rainy days. We have done shaving cream art a few times. The first time we did shaving cream art Little BBQ went nuts mixing the colors that he ended up with a mud green colored design. We also used a whole 8 ½ x 11” sheet of paper for the art design, but I have found that I like doing this project with smaller sheets of paper because it seems more manageable to dip the paper in the shaving cream with a small piece of the paper than with a large piece of paper. This time around we did the shaving cream art with Easter cut outs that were my patterns for my Easter marshmallow candy. 
Materials from Artful Parenting
Large flat container
Shaving cream
Food Coloring
Spoon or other item to mix the colors together with
Paper, cut into any size and shape desired
Wash cloth or paper towels
Directions

1.       Fill the bottom of the container with shaving cream.
2.       Add several drops of various colored food coloring to the shaving cream. Mix the colors together using a spoon or other mixing item. Be careful not to over mix the colors.
3.       Dip one side of the sheet of paper onto the shaving cream. Press down on the paper to make sure that the entire surface of the paper is coated with colored shaving cream.
4.       Lift up the sheet of paper out of the shaving cream and lay down  the paper shaving cream side up to absorb the colors for 2 minutes.
5.       Wipe the shaving off the paper shapes.
6.       Allow the paper to fully dry and enjoy your shaving cream art.

Book: Commotion in the Ocean

We have been working on studying the ocean and creatures that live in the ocean. One book that we really loved was Commotion in the Ocean. The book had pretty bright pictures and a story line that just had a nice rhythm to it when you read it out loud. The book didn’t go into any technical details but instead just made light of different characteristics of sea life. We decided to make our ocean. We made a clam, crab, dolphin, fish, and a jellyfish. This was a perfect preschool book.

Shibley Smiles

Friday, April 15, 2011

Book: Flower Ball

I love books that use a lot of personification; I think it helps to stimulate a child’s imagination. The book, Flower Ball by Sigrid Laube, is a fun fantasy book about inclusion and acceptance. In the book, the vegetables and the flowers don’t get along, but no one can remember why they don’t get along. One day cauliflower decides that he wants to attend the beautiful flower ball; carrot decides to join him. The two travel together to the flower ball where the flowers stare at the party crashers. As the evening goes on the two groups realize that there really is no reason that they don’t like each other, and they decide to become friends. As our activity for this book we decided to personify dandelion since there are so many bold dandelion flowers in bloom right now. Little BBQ informed me that dandelion is a male who wears a dress, so we made a paper doll that wears and dress. He drew a face on dandelion. Little BBQ gave dandelion a hat on top of his well decorated dress.


PhotobucketShibley Smiles


Friday, April 8, 2011

Music: Making a Zither


This week we have been working on slowly reading The Story of the Incredible Orchestra by Bruce Koscielniak which is an amazing nonfiction book of the history of the orchestra. We read the page on early musical instruments and came across a zither. I was unfamiliar with a zither, so we went on you tube and found some videos of people playing zithers.  We really enjoyed the relaxing music that large zithers produce (found in the korean video). It is a bit rustic sounding but still really pretty. It reminds me a bit of a harp.  A small zither reminds me more of a banjo (found in the Austrian and German videos). Some of our favorite zither music is listed below:
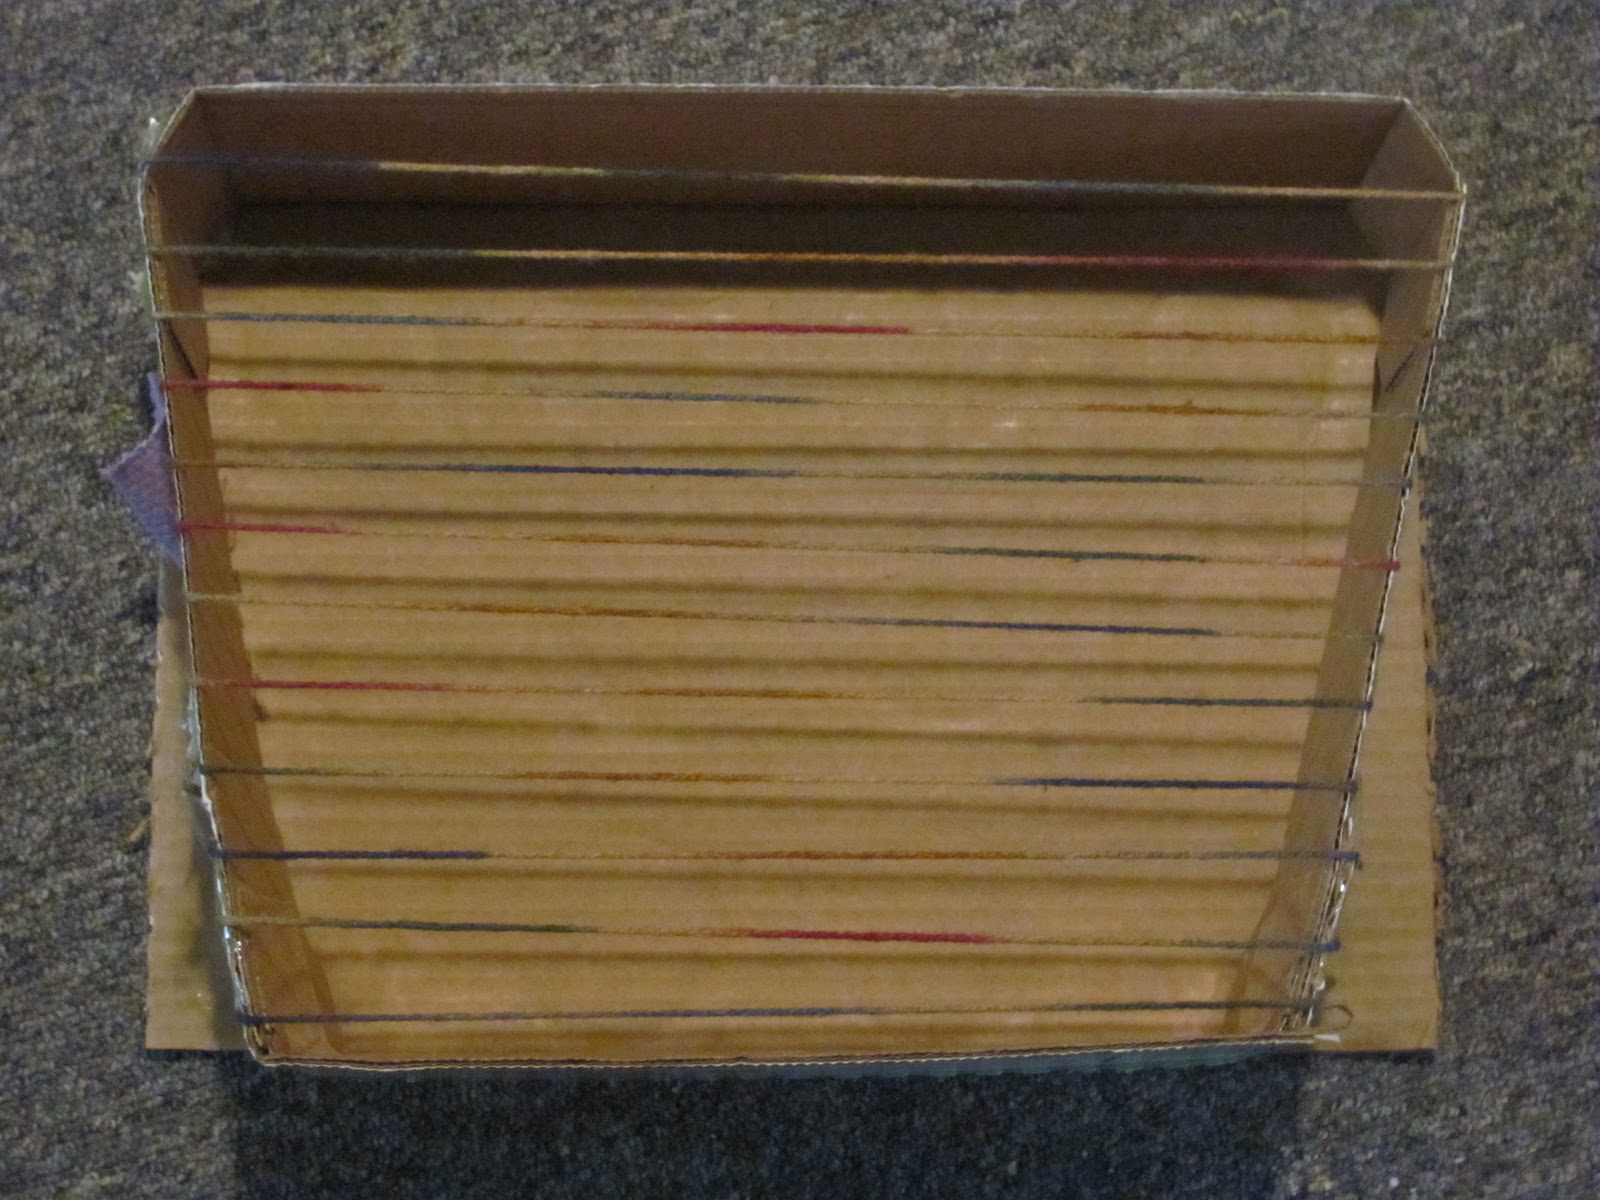
We also decided to make a zither. Our zither only ended up with 12 strings because I wanted enough room for Little BBQ to easily strum his zither.
Materials
A shallow card board box (I used a box for canning jars)
Scissors (they need to be sharp enough to cut through the card board box)
12-40 pieces of string long enough to drape across the box
Tape

Stuff to decorate the zither (we used patches of cloth and glue)

Directions

1.       Cut two parallel sides of the card board box at the crease.
2.       Gently move the sides inward about 1 inch to make a trapezoid. Fold the back end up towards the inward folding sides. Tape the trapezoid together.
3.       Trim the back end of the box to be the same height as the sides.
4.       Tape string across the zither from one inward folded side to the other inward folded side.
5.       Trim the excess string.
6.       Decorate your zither.


Shibley Smiles


Related Posts Plugin for WordPress, Blogger...