Pin It
We have been enjoying the Christmas season here at our house. We have also been doing a lot of learning. We read the book, Even Steven and Odd Todd by Kathryn Cristaldi which teaches children about odd and even numbers. We decided to make a Christmas themed craft about Even Steven and Odd Todd to reinforce the odd even pattern. We cut out a ginger bead chain out of paper. The original intent was to use brown paper, but we were out of brown construction paper and we did not have a paper bag so we improvised and used yellow paper instead. Even Steven all looks the same with a white button on his right arm, black button on his left arm, and a blue heart in the middle. Every Odd Todd looks different although Little BBQ did not want him to look too different because he wanted Odd Todd to have friends and dress nice. I think my little boy is already very socially conscious.
Posted on virtual refrigerator
Showing posts with label rainy day activities. Show all posts
Tuesday, December 6, 2011
Tuesday, June 21, 2011
Cheap and Easy Bathtub Paint
One of my friends posted a great idea for bathtub paint on Pinterest. The original idea came from Meet the Dubiens. The idea was so simple that I was kicking myself for never thinking of it before. To make easy bathtub paint just add a few drops of food coloring to shaving cream. We have tried to play with shaving cream in the bath tub before, but Miss Bubbles and Little BBQ were never that interested. I guess white shaving cream on a white bathtub wall is just not that enchanting, but when you add color the shaving cream it is a whole new story. Both kids were excited and loved painting on the bathtub walls with the colored shaving cream. The best part is that it is much cheaper than buying expensive bath tub paint from the store. Miss Bubbles has painted in the bath tub twice today, and I am thankful that this is much easier to clean up after than her usual painting adventures. I call this activity a double win for me and the kids on this gloomy rainy day.
Friday, April 22, 2011
Egg Shell Art
Pin It
We were originally going to have 18 cascarones this year, but I dropped some of the eggs on the floor, and they shattered. Instead of crushing them further and adding them to my garden like I normally would I decided to make an art project out of the crushed eggs. Little BBQ took the egg shells and added them to egg dye. We dyed them like a normal egg. Then I let Little BBQ have a bottle of glue and the dried crushed eggs. He took my patterns from my marshmallow Easter candy and glued the egg shells to the patterns creating a fun little Easter project that we will probably do again in winter when I don't have a garden that needs extra calcium from the egg shells.
Materials (source: from our home)
Broken egg shells
Cups
Hot Water
Food coloring
Vinegar
Paper towels
Paper
Glue
Directions
1. For each color of egg shell, you will need 1 cup for dying the shells, 1 cup hot water, a few drops of food coloring, and 1 tsp vinegar. Mix these ingredients together and add the eggs shells.
2. Once the egg shells are the desired color, remove the egg shells and let them dry overnight on a paper towel.
3. On the next day, glue the egg shells to a piece of paper to create a work of art.
Posted on Easter Blog Hop
Cascarones
Pin It
As a kid we used to make cascarones for Easter and Fiesta. Everyone would meticulously save their hollowed out eggs for moths to later dye and fill with confetti. The belief is that a person who has a cascarone broken over their head will have good luck. Our family saves those little paper dots from the hole puncher to put inside the eggs making this a fun frugal project.
Little BBQ called the tissue paper that covers the hole in the egg a "hat." He told me that the eggs were faces and we were putting hats on top of the eggs. I thought it was a cute and funny story. We will definitely be doing this project again next year.
Materials (makes 12 cascarones)
12 Eggs
Cups
Hot water
Food Coloring
White Vinegar
Paper towels or drying rack
Confetti or hole punch dots
Tissue paper
Scissors
Glue
Directions
1. Poke a small hole at the top of the egg and remove the insides. Wash out the egg shell with hot water and allow the egg shell to dry over night.
2. Decide how many different colors of cascarones that you want to make. We made four different colors. For each color, you need 1 cup, 1 cup of hot water, several drops of food coloring, and 1 tsp of white vinegar. Mix all of these ingredients together for each color inside the cup.
3. Carefully dye each egg by placing the egg in the cup with the desired color. The longer you let the egg sit the color, then the darker the egg with become. Place the dyed eggs on a drying rack.
4. When the eggs are fully dry, carefully insert the confetti inside each egg.
5. Cut little tissue paper squares to cover the holes.
6. Glue the tissue paper squares over the hole of the egg.
7. Let the glue dry and break them on top of people's heads that you want to have good luck.

Melting Experiment: Molded Crayons
It has been a rainy week here in the Midwest which means lots of energy has been flowing through our house. We decided to make some molded crayons in spring shapes. My mom did this project with me as a kid. As a kid we did the project as an art project, but I decided to use this opportunity to teach Little BBQ about melting. Melting is simply changing a solid to a liquid by using heat. This leads to a discussion about what is solid and what is liquid? We ran around the house and found examples of both solids and liquids.
To get the pretty spring molded shapes we use a candy mold. The crayons were all broken already peeled crayons, so this was a frugal rainy day activity. We heated the broken crayons in the microwave. We sorted the crayons into different containers for each color. It took about 4 minutes to melt the crayons in the microwave. Using oven mitts Little BBQ poured the liquid crayons into the molds. The first time we melted the wax in the microwave we made the wax too hot and melted part of the mold, so you want to take crayons out of the microwave as soon as they become liquid so you can preserve your candy mold for later use. Once the crayons were dry we flipped the mold over and the crayons fell out. Little BBQ went a little nuts pouring the wax on top of the mold and over filled some of the molds, so we broke off the excess crayon after we took the crayons out of the mold. You can remelt the excess crayon again. To clean out the dishes that you melt the crayon inside, microwave the dish for about 30 seconds and wipe away the warm wax with a paper towel (I did this part).
This was a fun project that we all enjoyed. Miss Bubbles enjoys coloring with the large butterflies because they fit into her hand easily. Little BBQ thought that they were pretty. I think we will do this project again when we accumulate more broken crayons.
Materials
broken crayons with papers removed
microwave safe bowls
oven mitts
candy mold
Directions
1. Sort the broken crayons by color. Place the different colors in a different bowl.
2. Microwave the crayons until just melted, about 4 minutes on high.
3. Using oven mitts, carefully remove the melted wax from the microwave.
4. Pour the wax over the mold. You can add several different colors to the mold.
5. Allow the wax to cool.
6. Turn over the mold and pop out the new crayons. Any excess wax can be trimmed and remelted.
Shaving Cream Art
We love art in our house on long rainy days. We have done shaving cream art a few times. The first time we did shaving cream art Little BBQ went nuts mixing the colors that he ended up with a mud green colored design. We also used a whole 8 ½ x 11” sheet of paper for the art design, but I have found that I like doing this project with smaller sheets of paper because it seems more manageable to dip the paper in the shaving cream with a small piece of the paper than with a large piece of paper. This time around we did the shaving cream art with Easter cut outs that were my patterns for my Easter marshmallow candy.
Materials from Artful Parenting
Large flat container
Shaving cream
Food Coloring
Spoon or other item to mix the colors together with
Paper, cut into any size and shape desired
Wash cloth or paper towels
Directions
1. Fill the bottom of the container with shaving cream.
2. Add several drops of various colored food coloring to the shaving cream. Mix the colors together using a spoon or other mixing item. Be careful not to over mix the colors.
3. Dip one side of the sheet of paper onto the shaving cream. Press down on the paper to make sure that the entire surface of the paper is coated with colored shaving cream.
4. Lift up the sheet of paper out of the shaving cream and lay down the paper shaving cream side up to absorb the colors for 2 minutes.
5. Wipe the shaving off the paper shapes.
6. Allow the paper to fully dry and enjoy your shaving cream art.
1. Fill the bottom of the container with shaving cream.
2. Add several drops of various colored food coloring to the shaving cream. Mix the colors together using a spoon or other mixing item. Be careful not to over mix the colors.
3. Dip one side of the sheet of paper onto the shaving cream. Press down on the paper to make sure that the entire surface of the paper is coated with colored shaving cream.
4. Lift up the sheet of paper out of the shaving cream and lay down the paper shaving cream side up to absorb the colors for 2 minutes.
5. Wipe the shaving off the paper shapes.
6. Allow the paper to fully dry and enjoy your shaving cream art.
Friday, April 8, 2011
Music: Making a Zither
This week we have been working on slowly reading The Story of the Incredible Orchestra by Bruce Koscielniak
which is an amazing nonfiction book of the history of the orchestra. We read the page on early musical instruments and came across a zither. I was unfamiliar with a zither, so we went on you tube and found some videos of people playing zithers. We really enjoyed the relaxing music that large zithers produce (found in the korean video). It is a bit rustic sounding but still really pretty. It reminds me a bit of a harp. A small zither reminds me more of a banjo (found in the Austrian and German videos). Some of our favorite zither music is listed below:
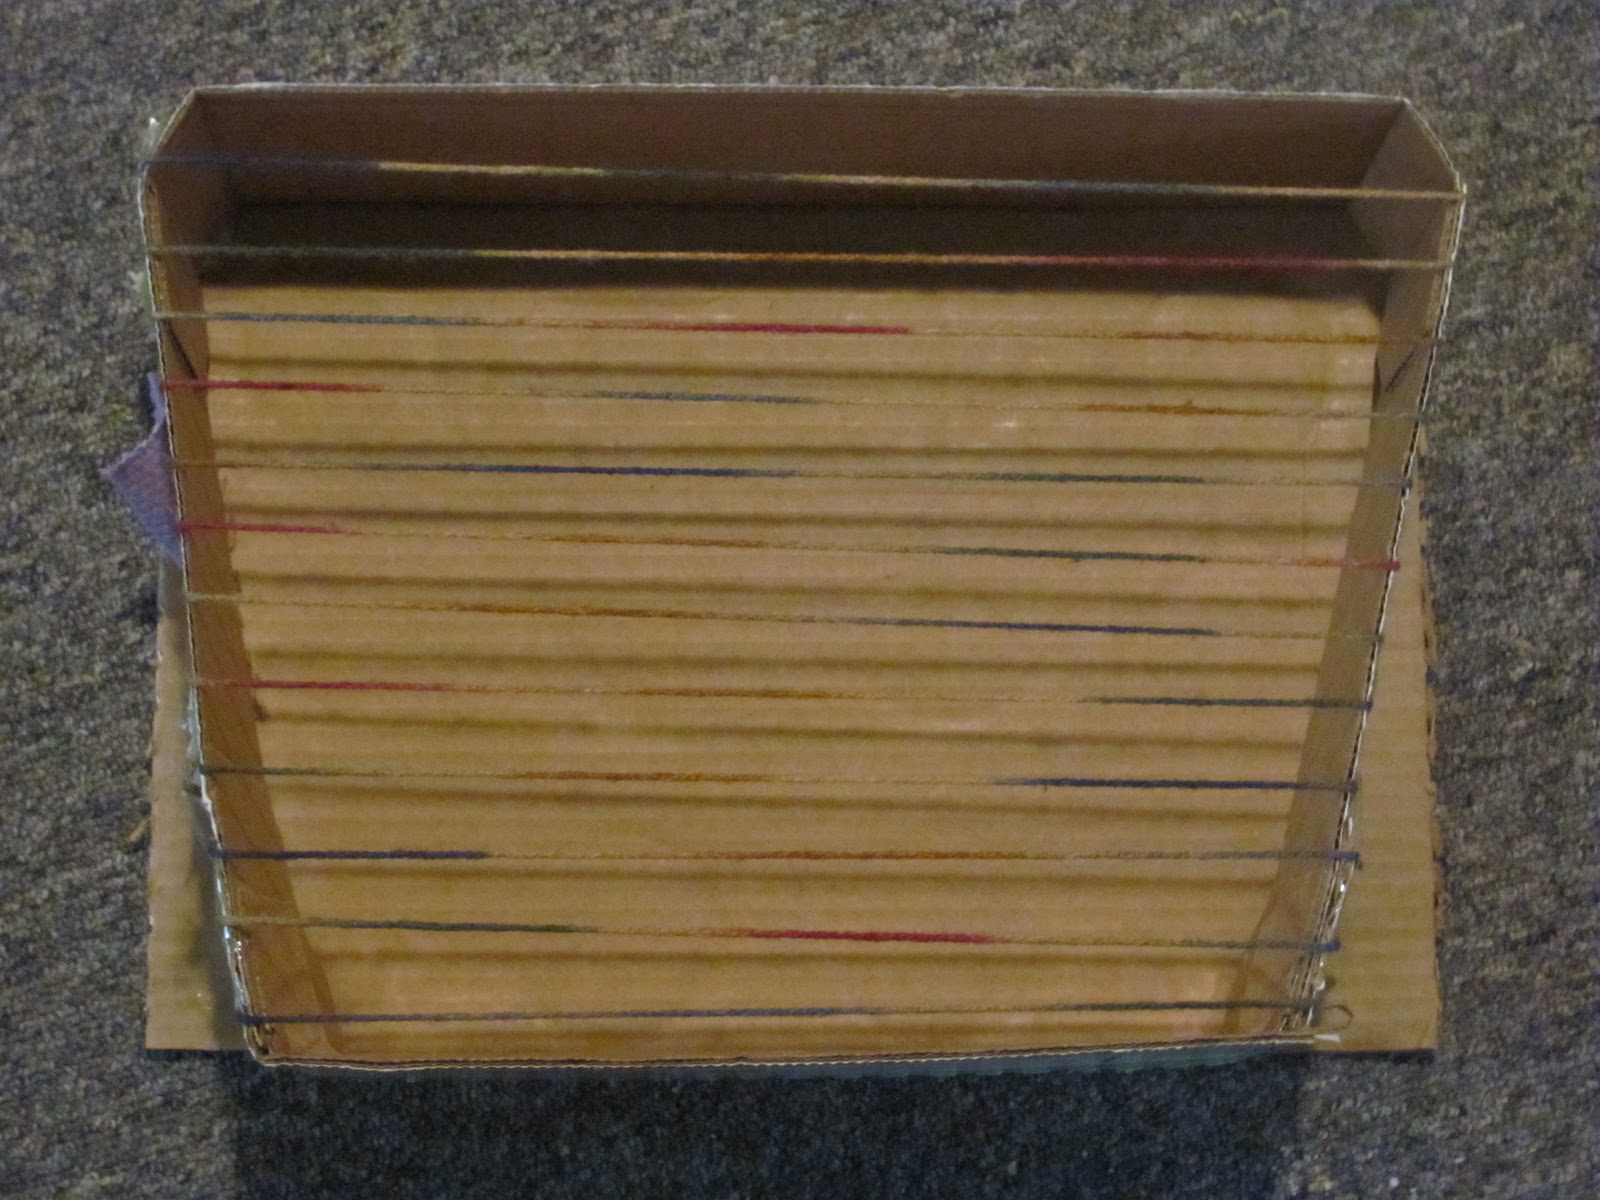
We also decided to make a zither. Our zither only ended up with 12 strings because I wanted enough room for Little BBQ to easily strum his zither.
Materials
A shallow card board box (I used a box for canning jars)
Scissors (they need to be sharp enough to cut through the card board box)
12-40 pieces of string long enough to drape across the box
TapeStuff to decorate the zither (we used patches of cloth and glue)
Directions
1. Cut two parallel sides of the card board box at the crease.
2. Gently move the sides inward about 1 inch to make a trapezoid. Fold the back end up towards the inward folding sides. Tape the trapezoid together.
3. Trim the back end of the box to be the same height as the sides.
4. Tape string across the zither from one inward folded side to the other inward folded side.
5. Trim the excess string.
6. Decorate your zither.


Wednesday, March 16, 2011
Book: Doggone Dogs
Little BBQ has requested a project using clay, so I decided to use clay in our story time activity. Doggone Dogs by Karen Beaumont
Thursday, March 10, 2011
Book: Imaginary Garden
Spring is here at is raining…a lot. With the warmer weather the kids and I are anxious to get outside and get our hands dirty in the garden, but Mother Nature has had other plans for us. To quell our desire to be outside we indulged ourselves into fantasy land with the book, The Imaginary Garden, by Andrew Larsen
. The book is about a little girl and her grandfather. The little girl loves her grandfather’s flower garden, but her grandfather moves to an apartment where he can no longer garden. To recreate the grandfather’s garden the pair decide to take a trip down fantasy lane and paint a picture of their ideal garden. As the season goes on the pair update the picture with more blooms.
Since we have already placed our seed order for the season, we did not need our seed catalogues anymore. Instead of throwing the seed catalogue away, Little BBQ was allowed to cut pictures from the catalogue and make his own imaginary garden. I was nervous about letting him use big boy scissors for the first time instead of toddler scissors, but he did well with the transition.
Sunday, February 6, 2011
The Very Hungry Little Caterpillar
Once a week we go to the library and stash up on books to read for the week. Last week we got the classic children’s book, The Very Hungry Little Caterpillar by Eric Carle
Wednesday, February 2, 2011
Tibetan Prayer Flags
One of the stories that we read was “Yeshi’s Luck” from the book Tibetan Tales for Little Buddhas
The other cool thing that the story highlights at the end is prayer flags. In Tibet, people write prayers on pieces of bright colored cloth and put them on a string and hang them outside (Rose, 2004, p 4). We obviously don’t know any Tibetan prayers, so we put things that we are thankful for on our Tibetan prayer flags. Some things that Little BBQ included on his flags were, “mommy, daddy, little sister, pink, food, kitties, and sun.” I also wrote a poem on one flag that was contained in the story. The poem is posted below.
Life is like a potter’s clay
changing shape from day to day.
As stars sparkle in the sky
light and dark go quickly by.
What’s the future, no one knows.
Be at peace with how life goes.
(Rose, 2004, p 23)
I am having Little BBQ memorize the poem. When things upset him, we discuss the poem. The poem is really beautifully and speaks to us all on those hard days when life seems to take a turn for the worse. I think our whole family can learn a lot from the Tibetan culture. I hope you enjoy our paper version of Tibetan prayer flags.
Box Assemblage
This week for math Little BBQ has been working on the concept of enclosure. For a young learner, “enclosure is when objects are grouped together and fenced or held together as a unit” such as a dozen eggs in an egg cart (Math Arts
Materials (modified from Math Arts
A cardboard box
Small objects to put inside the box (we used items from nature)
Glue
Process
1. Choose the small objects to be placed inside the enclosure.
2. Place the objects inside the box.
3. Rearrange the items until the young artist is satisfied with arrangement.
4. Glue the objects inside the box.
5. Display the assemblage in a special place.
This post was featured on Carnival of Homeschooling
Books that we read this week:
The Spice of Life
He really liked the scent of cinnamon, but he was not a fan of curry which is ironic because he loves Indian food. The end result was a highly fragrant collage that is hanging in Little BBQ’s “art gallery.” This activity was another great rainy day activity.
Materials
Paper (we used red construction paper but you can use any type of paper)
Variety of ground herbs and spices (we used oregano, curry, lemon pepper, cinnamon, nutmeg, paprika, mustard, and garlic)
Glue
Instructions
1. Make a glue picture or pattern on the paper.
2. Smell an herb or spice and identify the herb or spice.
3. Place the herb or spice on top of the glue.
4. Brush off any excess herb or spice into a trash bag.
5. Repeat steps 1-4 until the picture is complete
Rain Dancer
Now I am mother of two children, and I want them to appreciate science and art as much as I do. I want them to get excited about the world around them. I want them to discover both art and science. Today I let my son explore diffusion through art. It was another dark rainy day, and I was excited when I saw this activity called, “Rain Dancer” in the book Science Arts because it actually used the rain in the activity. The age recommendation was age 4 and up, but I decided to let Little BBQ try it anyway even though he is only 3.5 years old. He was a little young to understand the concept of diffusion, but he did enjoy the process of doing the project which was great. We are definitely going to save this activity for another rainy day.
Modified from the book Science Arts page 24:
Materials
Rainy day
White paper (we used computer paper)
Kids paint
Paintbrushes
Art experiment:
1. Paint the white sheet of paper.
2. Put the painted paper outside and let the rain hit the paper.
3. Bring the paper back inside after 5 minutes or until desired amount of spreading has occured.
Little BBQ tore the paper trying to bring it inside, but the concept is still there.
Science Concept Learned:
Diffusion occurs when the water droplets hit the paint on the paper. The pigments from the paint are in high concentration on the paper, but the pigments begin to diffuse or spread out across the paper once the water hits the paint.
This post was featured on Carnival of Homeschooling. and Homeschool Showcase #60
Subscribe to:
Posts (Atom)